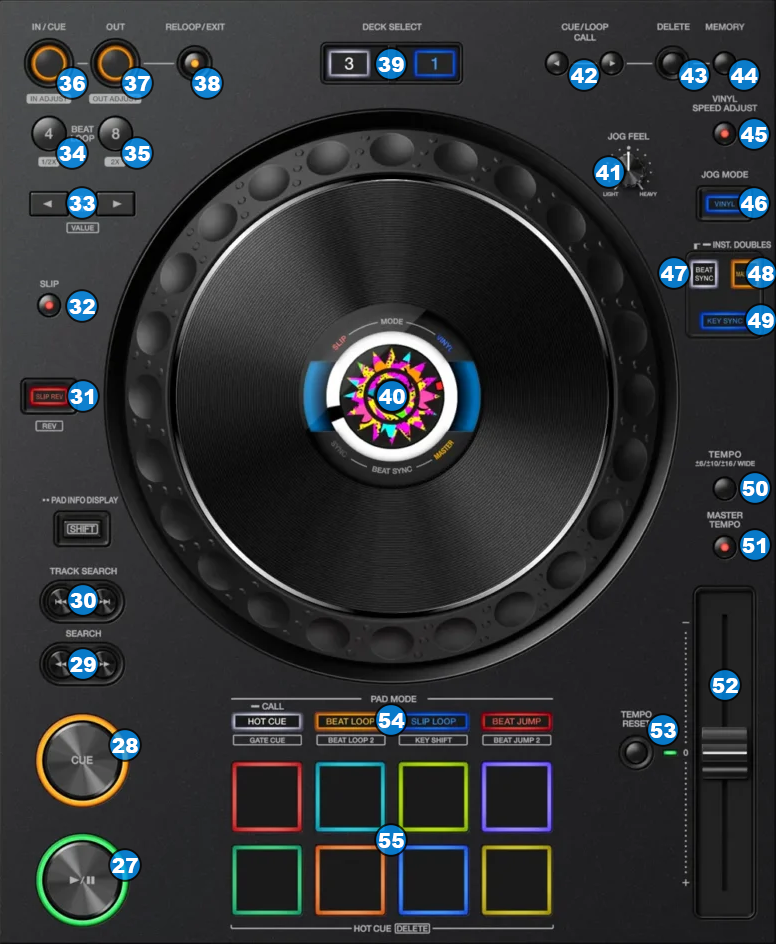
PLAY/PAUSE. Plays / Pauses the track. Press and hold SHIFT and then press this button to "stutter-play" the track from the last set Cue Point.
Cue . When the Deck is paused, you can set a temporary Cue Point by moving the Platter to place the Audio Pointer at the desired location and then pressing the Cue Button. During playback, you can press the Cue Button to return the track to this Cue Point. (If you did not set a Cue Point, then it will return to the beginning of the track.). If the Deck is paused, you can press and hold the Cue Button to play the track from the Temporary Cue Point. Releasing the Cue Button will return the track to the temporary Cue Point and pause it. To continue playback without returning to the Temporary Cue Point, press and hold the Cue Button, then press and hold the Play Button, and then release both buttons. Hold down SHIFT and then press this button to return to the beginning of the track.
SEEK. Use these buttons to seek your position through the track.
TRACK SEARCH. Use these buttons to load the previous or next track on the deck. The playback status of the deck is kept during load.
SLIP REVERSE. Press and hold this button to play the track backwards. On release the track will continue from the position it would have been if the button was never pressed. Hold down SHIFT and press this button (momentarily) to play the track backwards. Press again to return to forward direction.
SLIP. Toggle Slip Mode. When Slip Mode is active several software functions (such as Jogwheel movements, HotCues and Loops ) will apply temporarily on the track, and the track will return to the position it would have been if those functions were not triggered.
BEAT JUMP: Use these buttons to move track backwards/forward in beats. Keep the buttons pushed for continuous seeking. The amount of beats to jump is adjustable. Hold down SHIFT and press Jump back button to halve the amount of beats. Hold down SHIFT and press the Jump forward button to double the size of beats. The amount of beats that the track will jump is shown on deck screen.
Loop 4. Press once to set a 4 beats Loop on the track. While the track is in a Loop , press again to halve the size of the current Loop .
Loop 8. Press once to set an 8 beats Loop on the track. While the track is in a Loop , press again to double the size of the current Loop .
Loop IN. Set a Loop In point (for manual looping). When a Loop is active, press once to use the JOG to adjust the Loop in point position. The LED of the button will start blinking fast. Press again to exit Loop adjust mode and return the jog to normal operation.
Loop OUT. Set a Loop Out point (for manual looping). When a Loop is active, press once to use the JOG to adjust the Loop out point position. The LED of the button will start blinking fast. Press again to exit Loop adjust mode and return the jog to normal operation.
RELOOP/EXIT. When in a Loop , press this button to exit the Loop and resume normal playback. Press this button once again to jump back to the last set Loop in point and resume last used Loop .
DECK SELECT. Switch Left decks (1 and 3) and Right Decks (2 and 4).
JOGWHEEL. Pressure sensitive platter for scratching (Vinyl Mode) or bending (CD Mode).
JOG FEELING ADJUST. Adjust the tension of the jogwheel (hardware operation).
Cue CALL. If a Loop is active, control the size of the Loop (half/double). If not, jump between the available hotcues.
DELETE. Use this button to delete the Saved Loop of the track (1st-default slot)
MEMORY. Use this button to save (and enable) a Loop at the current position to the 1st (default) Saved Loop slot. When a track has a Saved Loop at the default slot, use this button to enable the Loop at its saved position. Track will jump to this position if current position is later to the Saved Loop , and will not jump if earlier.
VINYL SPEED ADJUST. Press this button to enable the Vinyl Speed emulation mode when using the PLAY/PAUSE button.
VINYL. Toggle the Jogwheel between the Scratch and Bend modes.
SYNC. Press this button to automatically match the corresponding Deck's tempo with the opposite Deck's (or the Master Deck’s if using a 4 decks Skin) tempo and phase. Hold this button down for more than 1 sec to clone the track from the other deck to this deck.
Master . Press this button to manually set a deck as " Master Deck" and stop automatic "master deck" selection. When a deck is set as "Master Deck" all sync operations of the other decks will take place against this deck. Press and hold down this button down for more than one second to resume automatic "Master Deck" selection.
KEY SYNC. Press this button to match the musical Key of the track with the Key of the Master deck (or the other deck if using a 2 decks skin). The change of the Key will be the smallest required to make it compatible with the other Key.
TEMPO RANGE. Press this button to select one of the available ranges for the TEMPO slider.
Master TEMPO. Press this button to "lock" the track's pitch to its original key. The track's tempo will remain at the speed designated by the TEMPO slider
TEMPO SLIDER. Controls the track's playback tempo.
TEMPO RESET. Reset the track's playback tempo back to it's original speed.
PAD MODE. Press any of the 4 available Pad mode buttons to set the Pads to HOTCUE, Loop , Loop ROLL, or BEATJUMP pad pages. Press and hold SHIFT and then press any of the 4 available Pad mode buttons to set the Pads to Slicer , Stems , KEYCUE or SAMPLER pad pages. For more info about how to assign different pages on your controller, please see PAD PAGE CONTROLLER ASSIGNMENT
PADS. The 8 Pads offer different functionality depending on the selected mode. For more info about Pad Pages, please see PADS