


DDJ-1000
Mixer & Effects
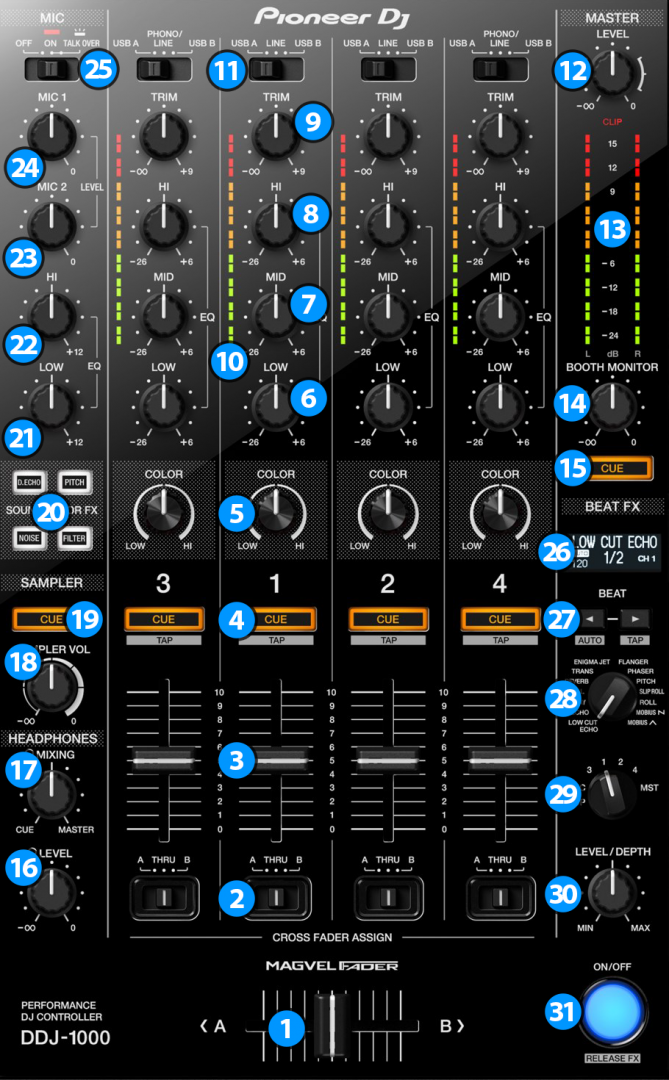
Mixer CONTROLS
- CROSSFADER. Blends audio between the channels assigned to the left and right side of the crossfader.
- CROSSFADER CH ASSIGN. Define if a Mixer channel will be output regardless of the position of the crossfader (THRU position) or Left/Right.
- VOLUME. Adjust the Volume of each channel. While SHIFT is held down, the VOLUME faders will stop the deck at the previously selected Cue when these reach the minimum level (zero) and will start the deck (synced to the other deck) if those move from the zero position. (Fader Start)
- Cue (PFL) (per channel) Press these buttons to send each channel to the Headphones Output channel.
- COLOR FX PARAMETER. Adjust the parameter of the selected COLOR FX for each channel. When in middle position, the COLOR FX has no effect on the sound.
- LOW EQ. Adjust the Low frequencies for each Mixer channel.
- MID EQ. Adjust the Mid frequencies for each Mixer channel.
- HI EQ. Adjust the High frequencies for each Mixer channel.
- TRIM. Adjust the Gain of each Mixer channel. Note that the "zero gain / park" position is 12 o clock.
- CH INPUT VUMETER. Shows each channels input (pre fader) volume.
- INPUT SELECTORS. Define the source of each Channel. Put the switchers to USB A or USB B position for software mixing.
- Master VOLUME. Adjust the level of the Master Output. Hardware operation but movement visible on the VirtualDJ GUI
- Master OUTPUT VUMETER. Shows the Master output volume of the unit. Hardware operation.
- BOOTH MONITOR. Adjust the level of the Booth Output of the DDJ-1000. Hardware operation, not visible on the VirtualDJ GUI.
- Master Cue (PFL). Send the Master Output of the unit to the Headphones Output channel. Please note that in order to hear the Master Output on your headphones you must also turn the HEADPHONES MIXING (17) knob to the desired position.
- HEADPHONES VOLUME. Adjust the volume of the Headphones Channel. Hardware operation, but movement visible on the VirtualDJ GUI.
- HEADPHONES MIXING. Adjust how the Channels and the Master Output blend at the Headphones Channel. Hardware operation, but movement visible on the VirtualDJ GUI.
- SAMPLER VOLUME. Adjust the Master Output Volume of the VirtualDJ Sampler
- SAMPLER PFL. Send the sound of VirtualDJ Sampler to the Headphones Output channel.
- SOUND COLOR FX. Select one of the predefined Color Effects (Dub Echo, Pitch, Noise and Filter).
- MIC LOW EQ. Adjust the Low frequencies of MIC1 and MIC2 Inputs of the DDJ-1000 (Hardware operation)
- MIC HI EQ. Adjust the High frequencies of MIC1 and MIC2 Inputs of the DDJ-1000 (Hardware operation)
- MIC 2 VOLUME. Adjust the Volume Level of MIC2 Input of the DDJ-1000 (Hardware operation)
- MIC 1 VOLUME. Adjust the Volume Level of MIC1 Input of the DDJ-1000 (Hardware operation)
- MIC CONTROL. Turn ON and OFF the MIC1 and MIC2 Inputs of the DDJ-1000 or enable the auto Talk Over. (Hardware operation)
EFFECT CONTROLS
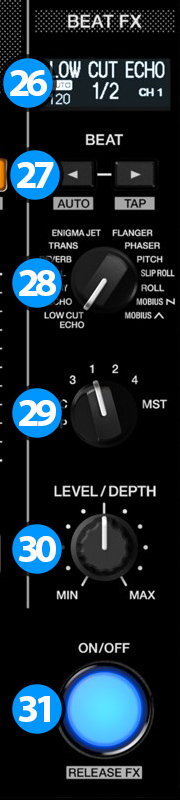 The BEAT FX section is used to apply Hardware or VirtualDJ effects to Decks/Master/Mic/Sampler, depending whether or not VirtualDJ is running. Hardware Effects will be applied when VirtualDJ is not running and VirtualDJ (software) effects will be applied when VirtualDJ is connected to DDJ-1000.*
*As of Firmware 1.05 released in June 2018 from Pioneer, hardware effects are always applied on analog sources, while software effects are always applied on digital sources. Devices with older firmware will not be able to use ANY effects on analog sources with the default mapper of VirtualDJ and will have to upgrade their Firmware to version 1.05 or greater.
- BEAT FX LCD SCREEN: Shows information about the selected effect.
- BEAT: Use these buttons to half/double the Beats Parameter of the selected Effect (for the Effects that are beat-aware). The beats value is displayed on the LCD screen.
- BEAT FX SELECT: Use this selector knob to select one of the available Beat FX. The name of the selected Effect is displayed on the LCD screen.
- BEAT FX ASSIGN: Use this selector knob to select to which source the effect will apply to. (Decks, Master , Mic or Sampler). The selected source will be displayed on the LCD screen.
- BEAT FX LEVEL: Use this knob to adjust the 1st Parameter of the selected Effect.
- BEAT FX ON: Use button to enable/disable the selected Beat FX. Its led will flash when enabled