


DDJ-RR
INPUTS, OUTPUTS & SETTINGS
The DDJ-RR offers 2 stereo Inputs (connections at the rear panel CH1 & CH2) that can be used with any analogue source and can be routed either directly to the software or the Master Output depending on the PCMIX switcher (rear side), along with a Microphone Input.
MICROPHONE
Connect a Microphone at the rear panel using the 1/4" MIC Input.
Hardware mode
When the PCMIX switch at the rear panel is set to OFF, the signal of the Microphone Input will be routed directly to the Master Output of the DDJ-RR, regardless if a software is running or not (Hardware routing). Adjust the volume output of the Microphone from the knob at the front panel.
The Microphone section of the Master panel of VirtualDJ will not affect the Microphone output, nor the Microphone will be recorded.
Software mode
When the PCMIX switch at the rear panel is set to ON, the signal of the Microphone Input will be routed to the software via the USB audio interface (Software routing).
The Microphone section of the Master panel of VirtualDJ will affect the Microphone output, and the Microphone will be recorded as well.
The volume output of the Microphone can be adjusted from both the Microphones Volume knob at the front panel of the DDJ-RR and the Mic Volume knob of the VirtualDJ GUI.
The Microphone needs to be turned on from the MIC ON button in the Master panel of the VirtualDJ GUI
In this mode (PCMIX to ON), the Microphone can be assigned to a VirtualDJ deck and offer the ability to apply Effects on the Microphone as well. You will need to assign the action deck 4 linein 'mic' to a keyboard key or a controller/custom button (can use a different deck number too).
INPUTS
Connect auxiliary media sources like CD Players, MP3 Players, turntables etc to any of the 2 available Inputs CH1 and CH2. Depending on the type of the source, the switcher LINE/PHONO needs to be set to the correct position (the PHONO option offers a pre-amp altenuator)
The signal of the Input Channels can be routed either directly to the Master Output or the DJ Application, depending on the PCMIX switcher position. The default audio configuration of the DDJ-RR includes the Line Ins, but they will not be used if the unit is set to Hardware mode (PCMIX to OFF)
Hardware Mixer mode
When the PCMIX switcher is set to OFF, the Input channels are directly routed to the Master Output, regardless if the unit is connected to a computer via USB or not. This mode is mostly used for cases where an auxiliary source is used as a backup solution in case of a computer failure.
Note that the EQ and the Filter knobs will not affect the input sound, nor the Inputs can be controlled by the Deck sides of the DDJ-RR when the DECK SELECT switcher at the top panel are set to PHONO/LINE
When the PCMIX is set to OFF, the Inputs cannot be used by VirtualDJ, despite the fact that those are available in the default Audio configuration of the unit.
Software Mixer mode
When the PCMIX switcher is set to ON, the Input channels are directly routed to USB interface, and the audio configuration of VirtualDJ needs to be adjusted in order those Inputs to be controlled by the application.
This mode is mostly used for Timecode Control (DVS) or when the software needs to control the Inputs (e.g. when you need to sync an auxiliary source with a software Deck or to record AUX sources along with your software mix)
In this mode, the Inputs will be assigned to Decks 3 and 4 automatically, each time the DECK SELECTOR switches are set to PHONO/LINE position.
TIMECODES
In order Timecode Control (DVS) to be used, such as Timecode Vinyls or CDs, you will need to ..
- Connect your Timecode sources (Turntables or CD Players with Timecode signal) to the Input channels CH1 and CH2 at the rear panel and set the switcher LINE/PHONO to the appropriate position depending on the type of the source.
Note that both Inputs are set to the same LINE/PHONO position, so a combination of a turntable and a CD player is not possible (or rather not suggested) - Open VirtualDJ Settings and head to the AUDIO tab.
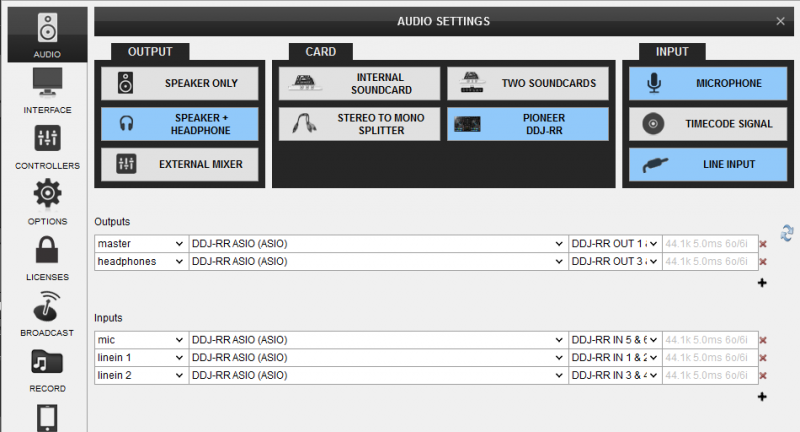
- Click on the Timecode SIGNAL button at the top-right of the window, so that 2 Timecode lines are automatically added to the audio configuration as per the following image. It is strongly suggested to remove the Linein lines from the audio configuration by clicking on the LINE INPUT button (line ins are included in the audio configuration by default)
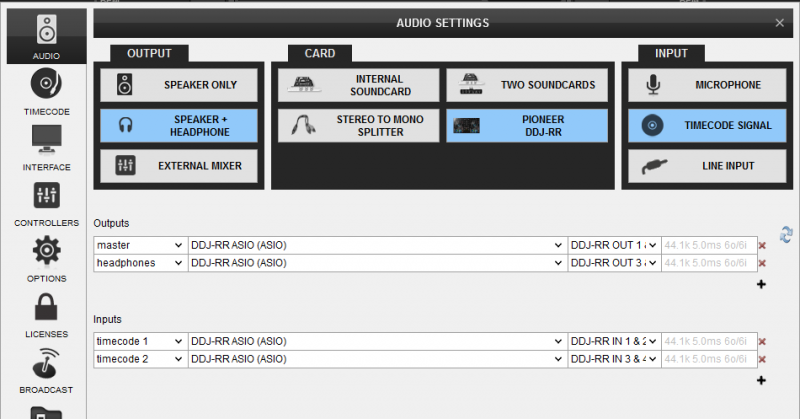
- Click to APPLY
When the Timecodes lines are included in the Audio configuration, the Timecode panels will appear on the VirtualDJ GUI. Click on those buttons to activate Timecode control to any of the left or right decks.
Rekordbox mode
The DDJ-RR offers 2 function modes. VirtualDJ will operate on both modes, but since some of the features are not available in both modes, it is strongly advised to set the unit to the Rekordbox mode (set by default).
In order to change/verify the selected mode ...
- Power off DDJ-RR
- While both left PLAY and left SYNC buttons are held, power on the DDJ-RR and then release the buttons. The unit should enter the UTILITIES mode.
- Make sure the Master TEMPO button on the left side of the DDJ-RR is turned off (Rekordbox mode)
- Power cycle the unit
BOOTH OUTPUT
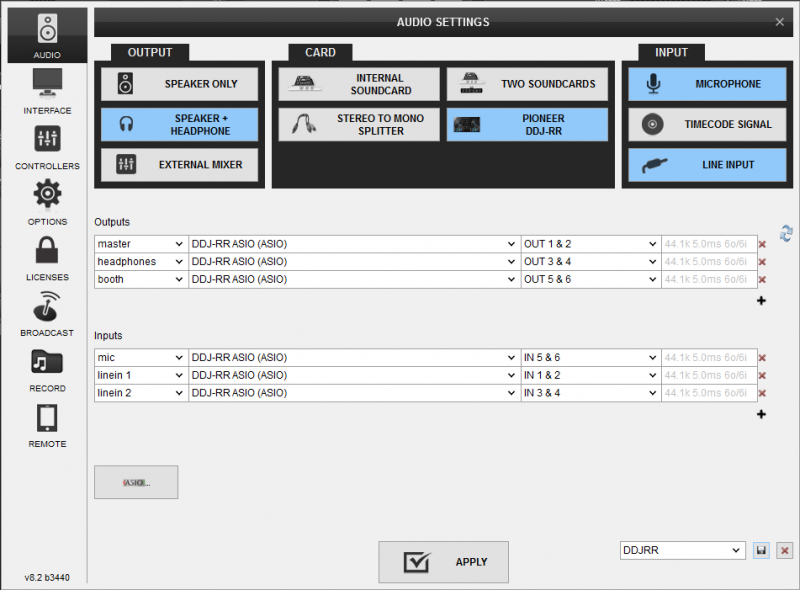
The Pioneer DDJ-RR has a dedicated Channel for the Booth Output, which is not part of the pre-defined audio configuration. In case you need to use the Booth Output, you will need to manually add a Booth line in the audio setup as shown in the image below
DDJ-RR Utilities Settings
The DDJ-RR offers a variety of Hardware settings via it's special firmware and VirtualDJ offers the ability to adjust most of them, through 2 special Pad modes (available when the DDJ-RR is connected and set to Rekordbox mode)
How to:
- Make sure the default GUI of VirtualDJ is used (or any other custom one which offers Pads controls)
- Click on the Pads page select button on either deck and select either the RR-JogLeds or the RR-Settings page.
- Place mouse over the Pads to read the Tooltip and help you with the assigned functionality
- Use the pads from either the GUI or the DDJ-RR to turn its assigned setting on/off.
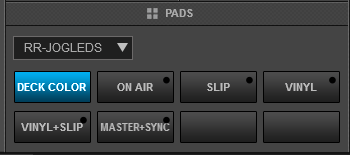
RR-JogLeds pad page
This Pads page offers the ability to select the behavior of the Jogwheel Led of the DDJ-RR
- DECK COLOR : When this option is selected, the Jogwheel Led of each deck of the DDJ-RR will get the color depending on the selected Left/right deck (Blue for Deck 1, Red for Deck 2, Green for Deck 3 and orange for Deck 4)
- ONAIR. When this option is selected, the Jogwheel Led of each deck on the DDJ-RR will get a green color is the coresponding deck is audible in the Master Output (On Air) and will be turned off when not.
- SLIP. When this option is selected, the Jogwheel Led of each deck of the DDJ-RR will get a red color when the Slip mode is enabled and blink red when Slip is active
- VINYL. When this option is selected, the Jogwheel Led of each deck of the DDJ-RR will get a blue color when the Vinyl mode is enabled and will be turned Off when the CD/Bend mode is selected (Vinyl mode off)
- VINYL+SLIP. When this option is selected, the Jogwheel Led of each deck of the DDJ-RR will get a red color when the Slip mode is enabled and blink red when Slip is active. When Slip mode is disabled, the Jogwheel Led of each deck of the DDJ-RR will get a blue color when the Vinyl mode is enabled and will be turned Off when the CD/Bend mode is selected (Vinyl mode off).
- Master & SYNC When this option is selected the Led of the Jogwheel will get an orange color when the Deck is set as Master -Deck and white when both decks are playing and the Deck is synced to other one but is not Master -Deck.
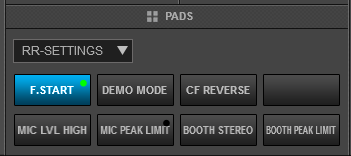
RR-Settings pad page
This Pads page offers the ability to adjust/select a few important features of the DDJ-RR
- F. START. When this setting is enabled, SHIFT+VOLUME faders will provide Fader Start/Stop functionality
- DEMO MODE. When this setting is enabled, the DDJ-RR will enter Demo mode after 10 mins of no usage.
- CF REVERSE. When this setting is enabled, the Crossfader will be reversed. Note that this is an additional Hardware setting. The Crossfader can be also reversed through VirtualDJ Settings or Mixer mode menu (available in the 4 decks VirtualDJ GUI)
- MIC LEVEL HIGH. Change this setting when the Microphone output is too low or too high, even after adjusting it with the Mic Volume knob at the front panel. When enabled, it sets the Microphone sound level to low and when disabled it sets to the high level.
- MIC PEAK LIMIT. When enabled, prevent unpleasant digital clipping of the Microphone Inputs
- BOOTH STEREO. Switches the setting for the Booth Output between Mono and Stereo.
- BOOTH PEAK LIMIT. When enabled, prevents unpleasant digital clipping on the Booth Output
