


RP-8000MK2
VirtualDJ Controls
DECK ASSIGN
The RP-8000MK2 is offering 4 individual MIDI channels (Hardware layers) and those are pre-defined to control 4 separate VirtualDJ decks. Each RP-8000MK2 unit can be assigned to a MIDI channel/deck as following:
- Hold down the NAV (10) encoder for approximately 3 seconds.
- The LCD Display (9) will then indicate the selected MIDI channel
- Turn the encoder to select a MIDI Channel (1 to 4) and push the encoder to make your selection or use Pads (12) 1 to 4
Note that the MIDI Channel (Deck) selection will be automatically offered after each unit's powering on.

- LCD. The LCD can display the Pitch ,the BPM value , the Track's Elapsed Time or Track's Remain Time.
To cycle through the available display modes, hold down both the SHIFT button and then use the Pitch Range 16% button - NAV ENC/PUSH. Turn the encoder to scroll through the tracks of the Songs List.
Push the encoder to load the selected track from the Songs List to the assigned deck or set focus to the SOngs list if set to Folders.
Push twice (fast double-push) to clone the track and position from the other deck to this deck
Hold SHIFT and then push the NAV encoder to set focus to the Folders list. If focus is on Folders list, the sub-folders (if available) of the selected folder will open/close. - PAD MODE SEL. Use these buttons to set the PADS (12) to one of the available Pad modes
- PADS. The 8 Pads offer different functionality, depending on the selected Pad mode as explained below
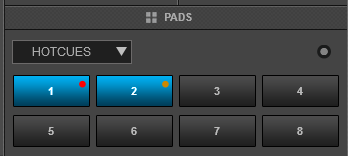
HotCues mode
The Hotcues Pad page will be automatically displayed on the PADS section of the default VirtualDJ GUI
Each one of the 8 pads assigns a Hot Cue Point (1 to 8) or returns the track to that Hot Cue Point.
When a Hot Cue Button is unlit, you can assign a Hot Cue Point by pressing it at the desired point in your track. Once it is assigned, the Hot Cue Button will light up.
Hold the SHIFT button down and then press any of the pads to delete its assigned Hot Cue Point.
Saved Loops mode
The Saved Loops Pad page will be automatically displayed on the PADS section of the default VirtualDJ GUI
Each one of the 8 pad represents a slot to save and recall a Loop .
Press a Pad to save (and trigger at the same time - if not already) a Loop at the current position.
Hold the same Pad down for more than 2 seconds to delete the saved Loop from the slot.
When a Loop is saved to a slot, use the same Pad to load* (enable) the saved Loop , but not jump to its position if the Loop is saved to a later position than the current one ( Loop load and prepare).
Hold SHIFT and then use the same Pad to load (enable) the saved Loop , and jump to its position.

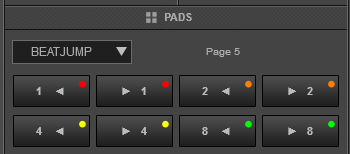
Beatjump mode
In this mode, the 8 Pads will jump the track backwards/forward by the amount of beats depending on the selected Beatjump page (from 1/8 beats to 32 Bars)
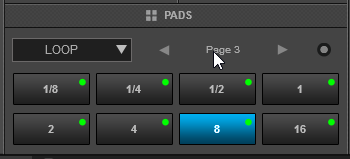
Loop mode
The Loop Pad page will be automatically displayed on the PADS section of the default VirtualDJ GUI
Each one of the 8 pads triggers a Loop of a different size in beats depending on the selected Loops Bank/page (selection from GUI)
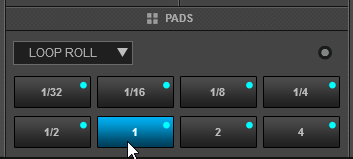
Loop Roll mode
The Loop Roll Pad page will be automatically displayed on the PADS section of the default VirtualDJ GUI
In Loop Roll mode, each one of the 8 Pads triggers a momentary (while pressed) Loop Roll of a different size in beats as per the image (from 1/32 to 4 beats).
When the pad is released, the track will return to the position it would have been if the Loop Roll was never triggered.
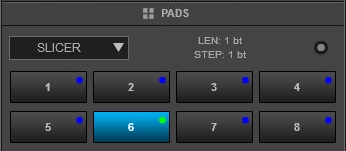
Slicer mode
The Slicer page will be automatically displayed on the PADS section of the default VirtualDJ GUI
The 8 pads represent 8 sequential beats—"Slices"—in the Beat Grid. The playing Slice is represented by the currently lit pad. The light will "move through the pads" as it progresses through each 8-Slice phrase. Press a pad to repeat that Slice (hold it down if you want to keep looping it).
Once the Pad is released the track will continue to play from the position it would have been if the pad was never pressed.
Hold SHIFT and press the Loop /ROLL mode button to toggle between Slicer (orange led) and Slice Hold (led will blink) modes. In Slicer Hold mode, the Pads will behave similar to Slicer mode , with the difference that the last triggered slice will be memorized and will be triggered as long as the Slicer Hold mode is selected.
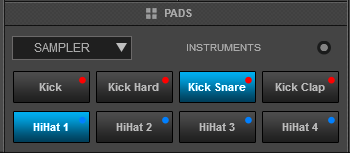
Sampler mode
The Sampler Pads page will be automatically displayed on the PADS section of the default VirtualDJ GUI
Each one of the 8 pads triggers a sample (1 to 8) from the selected Sampler Bank of VirtualDJ.
The leds of the Pads will be turned on in a color matching its assigned color and will be dimmed when the sample is not playing.
Depending on the selected Trigger mode (On/Off, Hold, Stutter or unmute - selection made from GUI), hold SHIFT and then press the same Pad to stop the playing sample
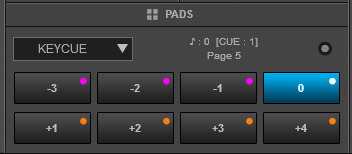
Key- Cue mode
The Key- Cue Pads page will be automatically displayed on the PADS section of the default VirtualDJ GUI
Each of the 8 Pads triggers the selected Hotcue point (or the Temporary Cue if none selected or not available) at a selected Key semitone (from -7 to +7).
Eight different pages/banks are offered (selection from GUI) with various semitone values to use and a 0 value in order to reset the key to its original value is always offered in all pages.
Each time a Pad is pressed, the track will jump to the selected Hotcue point and will also alter the Key of the track to the value designated by its assigned value.
Hold SHIFT and then press a Pad to select a different Hotcue for the Key pads to trigger.
Custom mode
Hold SHIFT and then press the SAMPLE/PITCH mode button to set the Pads to Custom/User mode (led will turn on orange)
The Custom Pads page will be automatically displayed on the PADS section of the default VirtualDJ GUI
In this mode the Pads can be customized and trigger any action assigned from the Pads Editor . See further details at https://virtualdj.com/manuals/virtualdj/editors/padseditor.html