DDJ-GRV6
Mixer & EFFECT CONTROLS

Mixer CONTROLS
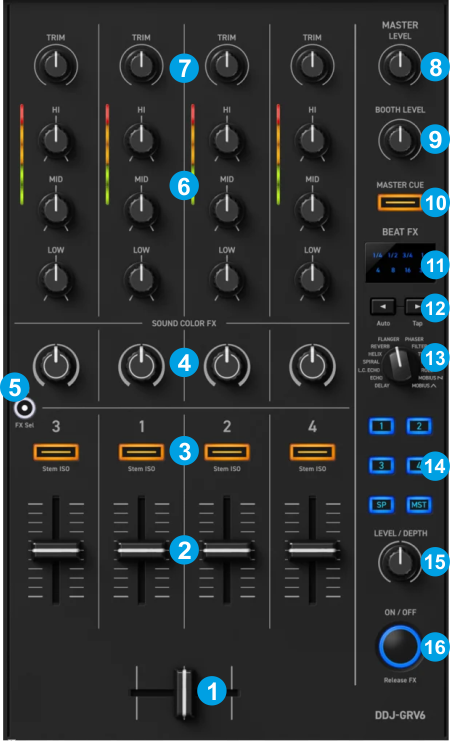
By default the Mixer Channels control the Decks with the Order 3 -1-2-4, but this can be changed from OPTIONS to a different Channel Order.
- CROSSFADER. Blends audio between the channels assigned to the left and right side of the crossfader. By default Decks 1 and 3 are assigned to the left side of the Crossfader, while Decks 2 and 4 are assigned to the right-side.
- VOLUME. Adjust the Volume of each channel.
- Cue (PFL) (per channel) Press these buttons to send each channel to the Headphones Output channel.
Hold SHIFT and then press any of these buttons to set the Eq Mode to either Frequency or Stems . When Stems is enabled, the button will blink while SHIFT is enabled and while a EQ knob is moved. - COLOR FX PARAMETER. Adjust the parameter of the selected COLOR FX for each channel. When in middle position, the COLOR FX has no effect on the sound.
- SOUND COLOR FX. Activate the selected Color FX to all Channels. When activated, the led of this button will blink. When not activated (led solid) the Color FX knobs will not have any impact to the sound.
Hold SHIFT and press this button to select the next available Color FX. By default the Filter Color FX is selected. - 3-BAND EQ. Adjust the Low/Mid/High frequencies (or the assigned Stems channel) for each Mixer channel. See EQ Mode
- TRIM. Adjust the Gain of each Mixer channel. The output level of each Channel will be shown as indication on the VU meters.
- Master VOLUME. Adjust the level of the Master Output (connection at the rear panel)
Note that this knob is applying its own Hardware level to the Master Output. Its position will be visible on the VirtualDJ GUI, but the GUI knob will not affect the level of Master Output (fake mode) - BOOTH MONITOR. Adjust the level of the Booth Output of the DDJ-GRV6 (connection at the rear panel).
Note that this knob is not assigned to any VDJ script action. It applies its own level to the Booth Output which is not part of the USB Audio interface. If you don's have any speakers connected to this output, you may assign it to any action. - Master Cue (PFL). Send the Master Output of the unit to the Headphones Output channel. Please note that in order to hear the Master Output on your headphones you must also turn the HEADPHONES MIXING (19) knob to the desired position.
EFFECT CONTROLS
The BEAT FX section is used to apply VirtualDJ effects to Decks 1 to 4, Master or Sampler.
- BEAT FX DISPLAY: Shows the selected Beats value of the selected effect.
- BEAT: Use these buttons to half/double the Beats Parameter of the selected Effect (for the Effects that are beat-aware). The beats value is displayed on the Display above.
- BEAT FX SELECT: Use this selector knob to select one of the pre-defined Beat FX. When a different Effect is selected, the previous Effect will be disabled, but the On/Off status will be copied to the new selected Effect
- BEAT FX ASSIGN: Use this selector knob to select to which Channel the effect will apply to. (Decks 1 to 4, Master , or Sampler). When a different Channel is selected, the Effect on previous Channel will be disabled, but the On/Off status will be copied to the new Channel
Note that by firmware design, there can only be one Channel selection. - BEAT FX LEVEL: Use this knob to adjust the 1st Parameter of the selected Effect (usually the Wet/Dry).
- BEAT FX ON: Use this button to enable/disable the selected Beat FX. Its led will flash when enabled


