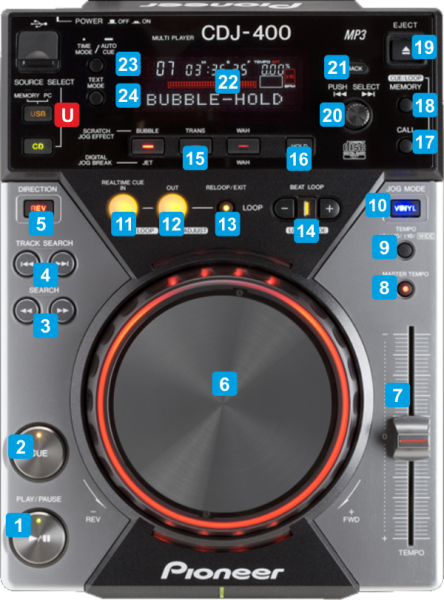
U USBPress this button to set the unit to PC mode in order to control a VirtualDJ deck. (the PC LED will be lit)1 PLAYPress to play the loaded track. Press again to pause the track. The LED will blink when track is paused and lit solid when track is playing2 Cue When track is paused, press this button to set current track's position as a temporary Cue point. Press and hold this button to preview track while held. While held, press PLAY to continue playing or release to return to the Cue position. When track is playing, press this button to return to the stored Cue position (or the beginning of the track if no Cue is set. The LED of this button will blink if the track is paused but current position is not the stored Cue point and lit solid in all other cases.3 SEARCHPress these buttons to move track backwards/forward by 4 beats (while kept pressed)4 TRACK SEARCHPress these buttons to move track backwards/forward by 4 seconds (while kept pressed)5 DIRECTIONPress this button to change the playback direction. When enabled (LED is lit) the track plays backwards. Press again to disable and continue normal playback from the current position.6 JOGWHEELUse the jogwheel to Scratch , pitch-bend or adjust the entry and exit Loop positions. When VINYL mode is enabled, use the upper/inner part of the wheel to Scratch the track backwards/forward and the outer part (side) to pitch-bend (temporary speed-up/slow-down tempo) When VINYL mode is disabled use any part of the jogwheel to pitch-bend (temporary speed-up/slow-down tempo) See Loop controls for Loop in/out adjust.7 TEMPOUse this fader to adjust the tempo (pitch) of the track. In middle position, the track will play at its original tempo (BPM). The pitch% and BPM value are displayed on the LCD of the unit.8 Master TEMPOUse this button to enable/disable Master Tempo (Keylock). When enabled, pitch/tempo changes will not affect the Key of the track9 TEMPO RANGEUse this button to select the % range for the Pitch fader. On each press, the range will cycle through 6,10,16 and 100%. The selected range is displayed on the LCD of the unit10 VINYLUse this button to enable/disable Vinyl mode. When enabled (LED is lit) use the inner/upper part of the jog to Scratch .11 Loop INWhen not in Loop , use this button to set current track's position as the beginning of the Loop . When in Loop , use this button to enable/disable Loop In Adjust mode (LED will blink fast) and then use the jogwheel to fine-adjust the entry point of the Loop .12 Loop OUTWhen Loop In is set, use this button to set current track's position as the end point of the Loop and enable the Loop .. When in Loop , use this button to enable/disable Loop Out Adjust mode (LED will blink fast) and then use the jogwheel to fine-adjust the exit point of the Loop .13 Loop When Loop is enabled, use this button to exit the Loop . When not in Loop , use this button to enable the last triggered Loop (reloop)14 BEAT Loop Use these buttons to half/double the size of the triggered Loop 15 MULTI BUTTONSThe 3 Multi-buttons can be assigned to control Hotcues, Samples and Effects. See Multi-Buttons for further details.16 HOLDThis button is used to modify the operation of the multi-buttons See Multi-Buttons for further details.17 CALLUse this button to cycle through the Temporary Cue and the saved Hotcues18 MEMORYUse this button to enable/disable Smart Loop . When enabled (MEMORY is displayed on the LCD), manually set Loops will snap to the nearest size in beats, offering a seamless Loop .19 EJECTUse this button to assign the unit to a different VirtualDJ deck. When a single CDJ-400 is connected the button is cycling assign through all the available skin decks. when a pair is connected, the button is cycling through the left or right VirtualDJ decks (1,3,5 etc or 2,4,6 etc)20 SELECT/PUSHTurn the rotary to scroll though the files or folders of the focused Browser list. When focus is on the Files or Sideview lists, push the rotary to load the selected track to the assigned deck. When focus is on the folders list, push the rotary to set focus to the Files list if the folder has tracks, or expand its sub-folders and move focus to the next one21 BACKUse this button to set focus to the Folders list of Browser. When focus is on the Folders list, use the same button to expand/collapse its sub-folders (if available)22 LCDThe LCD screen offers information about the Remain/Elapsed Track time, its current BPM, the applied Pitch(tempo) and its range, along with a line of 12 characters scrolling the Track's Artist and Title. The same line is used to temporary display the menu options and functions of the Multi-Buttons. See Multi-Buttons for further details.23 TIME MODEUse this button to toggle Time Display between Remain and Elapsed Time. Hold the button for more than 1 second to enable/disable Auto- Cue . When enabled (A. Cue is displayed on the LCD), the tracks will be loaded at the Hotcue 1 position (or the beginning of the track if Hotcue is not set)24 TEXT MODEUse this button to cycle the 3 Text display modes and show the Artist, Title or Artist - Title on the Text line of the LCD