


DDJ-SX3
Deck Controls
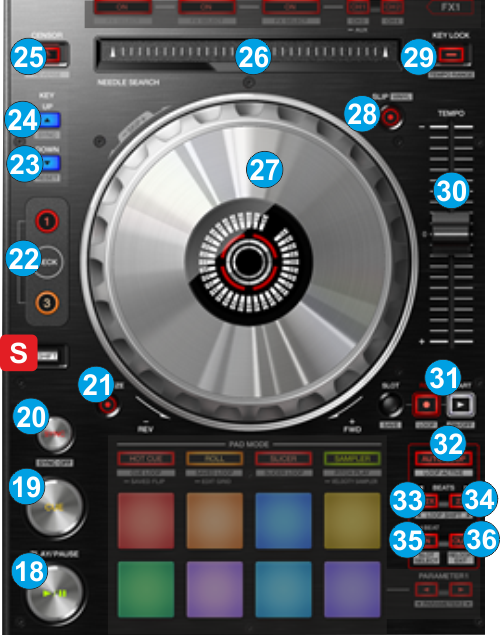
S SHIFT Hold this button down to access secondary functions of Pioneer DDJ-SX3 (mainly in black lettering inside a gray box)
- PLAY/PAUSE: Plays / Pauses the track. Press and hold SHIFT and then press this button to "stutter-play" the track from the last set Cue Point.
- Cue : When the Deck is paused, you can set a temporary Cue Point by moving the Platter to place the Audio Pointer at the desired location and then pressing the Cue Button. During playback, you can press the Cue Button to return the track to this Cue Point. (If you did not set a Cue Point, then it will return to the beginning of the track.). If the Deck is paused, you can press and hold the Cue Button to play the track from the Temporary Cue Point. Releasing the Cue Button will return the track to the temporary Cue Point and pause it. To continue playback without returning to the Temporary Cue Point, press and hold the Cue Button, then press and hold the Play Button, and then release both buttons.
Press and hold SHIFT and then press this button to return to the beginning of the track. - SYNC: Press this button to automatically match the corresponding Deck's tempo with the opposite Deck's (or the Master Deck’s if using a 4 decks Skin) tempo and phase. Press and hold SHIFT and press this button to set this deck as Master Deck (for 4 decks skins).
- QUANTIZE: When enabled, several actions such as Hotcues and Loops will be quantized (snapped to the nearest beat or other fraction of a beat depending on the GlobalQuantize setting)
- DECK SELECT: Select the VirtualDJ Deck that the left/right side of the DDJ-SX3 will control. Left side can be assigned to decks 1 or 3. Right side can be assigned to decks 2 or 4.
When both 1/3 or 2/4 buttons are pressed, the corresponding side of the DDJ-SX3 will be assigned on both decks and several actions such as scratching, play, Loop etc will apply on both decks. Useful when wanting to start/stop both left (1 and 3) or right (2 and 4) decks at the same time. - KEY DOWN: Use this button to set the Key of the track one semitone down (-1). Hold SHIFT and then use the same button to reset the Key of the track to its original value
- KEY UP: Use this button to set the Key of the track one semitone up (+1). Hold SHIFT and then use the same button to match the Key of the track with the one of the opposite deck.
- CENSOR: Press and hold this button to play the track backwards. On release the track will continue from the position it would have been if the button was never pressed. Hold SHIFT down, and then press this button (momentarily) to play the track backwards. Repeat the procedure to play again forward.
- STRIP SEARCH: The length of this strip represents the length of the entire track. Place your finger on a point along this sensor to jump to that point in the track (song position). Please note that while a deck is playing “on air” the strip search will not function in order to prevent sudden accidental jumps that may occur if you touch the stripe by accident while you operate other controls. If you want to jump on a new position while the track is “on air” please hold down SHIFT button first and then touch the strip to bypass security.
- JOGWHEEL: Touch sensitive platter for scratching (vinyl mode) or bending (CD Mode). The white inner leds will rotate according to the software jogwheel position and they will also blink at the last 30 seconds of a track. The red leds will blink if you Scratch while Slip Mode is active or will turn on when you touch the touch-sensitive surface.
- SLIP: Enables Slip Mode. When enabled (led is lit), several software functions (such as Jogwheel movements, HotCues and Loops ) will apply temporarily on the track, and the track will return to the position it would have been if those functions were not triggered. Hold SHIFT and press this button to toggle between the JOGWHEEL between Scratch and Pitch Bend modes.
- KEYLOCK: Press this button to "lock" the track's pitch to its original key. The track's tempo will remain at the speed designated by the Pitch Fader. Press and hold the button for more than 1 second to smoothly reset the Pitch of the track to zero (original tempo).
Hold SHIFT and then press this button to cycle through the available pitch range values. - PITCH: Controls the track's playback tempo.
- FLIP BUTTONS: These buttons do not perform any predefined action in VirtualDj. You can use them to map any action you want.
- AUTOLOOP: Sets an Auto Loop in beats equal to the selected size. Hold SHIFT and press the same button to activate the 1st Saved Loop . When the Saved Loop is active, the track will jump to its position when current track's position is later to the position of the Saved Loop .
- HALF: Halve the size of the Loop . Hold SHIFT and press this button to move the active Loop backwards in beats equal to the length of the Loop
- DOUBLE: Doubles the size of the Loop . Hold SHIFT and press this button to move the active Loop forward in beats equal to the length of the Loop
- IN: Use this button to set the begging of a manual Loop . When Loop is enabled, press this button to set the Jogwheel to Loop In Adjust (led will blink) and use the jogwheel to fine adjust the Loop 's in (start) point. Repeat the procedure to set the jogwheel back to its original operation (will be automatically reset when exit the Loop ).
Hold the same button for more than 1 second to activate a 4 beat Auto Loop .
Hold SHIFT down and then press this button to Save a Loop (at 1st slot). While SHIFT is held down, press and hold this button for more then 1 second to delete the Saved Loop . - OUT: Use this button to set the end (Out) position of the manual Loop . When Loop is enabled, press this button to set the Jogwheel to Loop Out Adjust mode (led will blink) and use the jogwheel to fine adjust the Loop 's out (end) point. Repeat the procedure to set the jogwheel back to its original operation (will be automatically reset when exit the Loop ).
Hold SHIFT down and then press this button to enable the last triggered Loop and jump to its position (re- Loop )