


DDJ-FLX10
Advanced Setup
Pioneer DDJ-FLX10 offers a variety of Inputs and Operation modes. The unit can operate both as MIDI and a stand-alone hardware Mixer at the same time, allowing mixing from analogue media sources (CD Players, Turntables etc) connected to one of the 4 available inputs at the rear panel, along with the ability to use a Computer DJ Application.
Mixer CHANNELS
Channel 3 (far left) :
Audio signal from an analogue source (such as a standard CD Player or Turntable) connected to the CH 3 inputs at the rear panel can be inserted and processed by the Mixer when the switcher at the top panel is set to Phono/Line position.
When using the CH3 inputs, please make sure that you set the corresponding switcher on the rear of the device to the proper position (line/phono) depending on the type of the connected audio equipment.
Audio signal from VirtualDJ Deck 3 can be routed to this Channel when the switcher at the top panel is set to USB A or USB B position (depending on which USB port your computer is connected to)
Channel 1 (middle-left) :
Audio signal from an analogue line level source (such as a standard CD Player) connected to the CH 1 LINE inputs at the rear panel can be inserted and processed by the Mixer when the switcher at the top panel is set to Line position.
Audio signal from VirtualDJ Deck 1 can be routed to this Channel when the switcher at the top panel is set to USB A or USB B position (depending on which USB port your computer is connected to)
Channel 2 (middle-right) :
Audio signal from an analogue line level source (such as a standard CD Player) connected to the CH 2 LINE inputs at the rear panel can be inserted and processed by the Mixer when the switcher at the top panel is set to Line position.
Audio signal from VirtualDJ Deck 2 can be routed to this Channel when the switcher at the top panel is set to USB A or USB B position (depending on which USB port your computer is connected to)
Channel 4 (far right) :
Audio signal from an analogue source (such as a standard CD Player or Turntable) connected to the CH 4 inputs at the rear panel can be inserted and processed by the Mixer when the switcher at the top panel is set to Phono/Line position.
When using the CH4 inputs, please make sure that you set the corresponding switcher on the rear of the device to the proper position (line/phono) depending on the type of the connected audio equipment.
Audio signal from VirtualDJ Deck 4 can be routed to this Channel when the switcher at the top panel is set to USB A or USB B position (depending on which USB port your computer is connected to)
Notes :
- Each time a different source is selected from the top switchers, the audio signal of other sources on the same channel will be muted.
- Switch between various sources is smooth, providing the ability of back-to-back dj changeover.
Recording & Broadcasting
The unit offers the ability to record the Master Output along with the Microphone and LINE Inputs directly from VirtualDJ record button (in the Master center panel). The dedicated Recording input channel is already pre-configured, so no further adjustments need to be done.
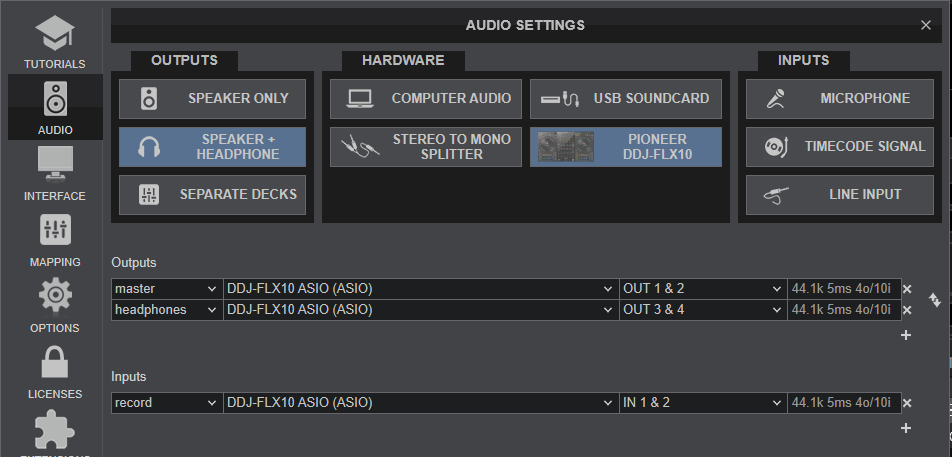
The recorded output includes any source routed to the Mixer , including analogue media sources connected to the LINE or PHONO Inputs when the top switchers are set to the relative position.
Note : If the signal of the Microphone inputs is not recorded, make sure the Controller setting PIFLX10-micRecord is enabled (see Controller Settings)
Timecodes (DVS)
DDJ-FLX10 offers DVS (Timecoded CDs and Vinyls) Support.
Depending on whether you use Timecode Vinyl (Turntables) or Timecode CDs (CD Players) please perform the following steps:
- Connect your Turntables to CH 3 and/or CH 4. If you use CD Players connect them to any of the available CH inputs Inputs.
- Place the Input switches on the top panel to USB A or USB B position for the related Mixer Channels (depending on which USB port your computer is connected to)
- Open VirtualDJ Settings ->AUDIO tab and press the Timecode SIGNAL button from the INPUT tab
- Click to APPLY
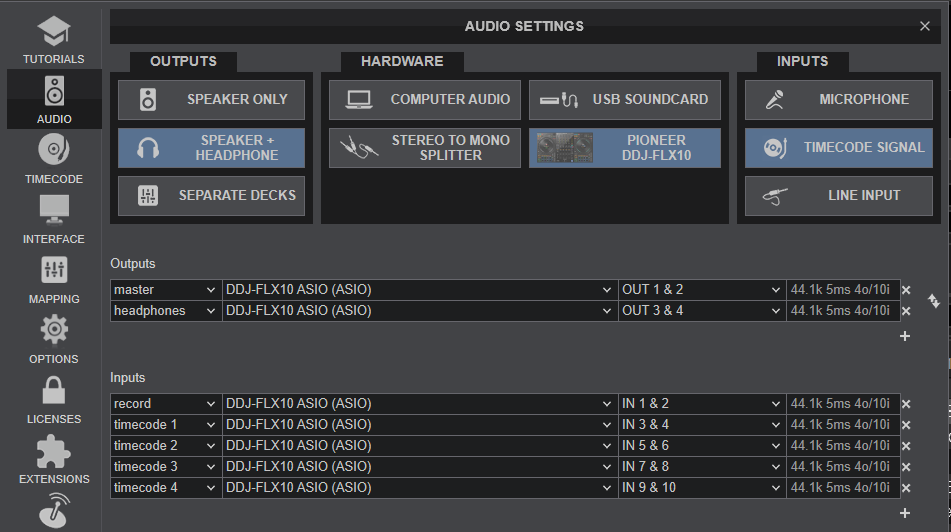
Use the Timecode On/Off buttons that will be offered on the Decks to enable/disable Timecode control or use the Timecode signal to control a different Deck (e.g. swap Timecode control for Left decks when the 4 Decks GUI is selected)
By default you would use Timecode Vinyls to control decks 3 & 4 and Timecode CD's to control deck 1 & 2
If you want to use Timecode Vinyls to control decks 1 & 2 instead then you should create the following audio setup:
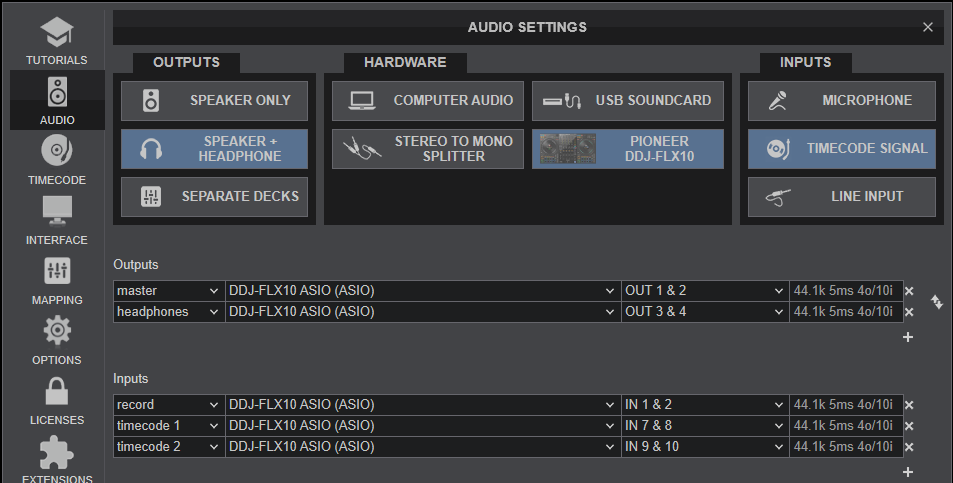
With this setup all the Input switchers on top of the Mixer should be set on the same USB port that your computer is connect to.
LINE INS
The LINE Inputs can be also used to send audio signal from an analogue media source connected at the rear panel to VirtualDJ for processing.
- Connect your analogue media devices to one of the available LINE inputs. If you connect a source on Line 3 and/or Line 4 input, remember to switch the Line/Phono switcher to Line position for that channel(s)
- Place the Input switches on the top panel to USB A or USB B position on your Mixer channels depending on with port your computer is connected at.
- Open VirtualDJ Settings ->AUDIO tab and press the LINE INPUT button from the INPUT tab
- Click to APPLY
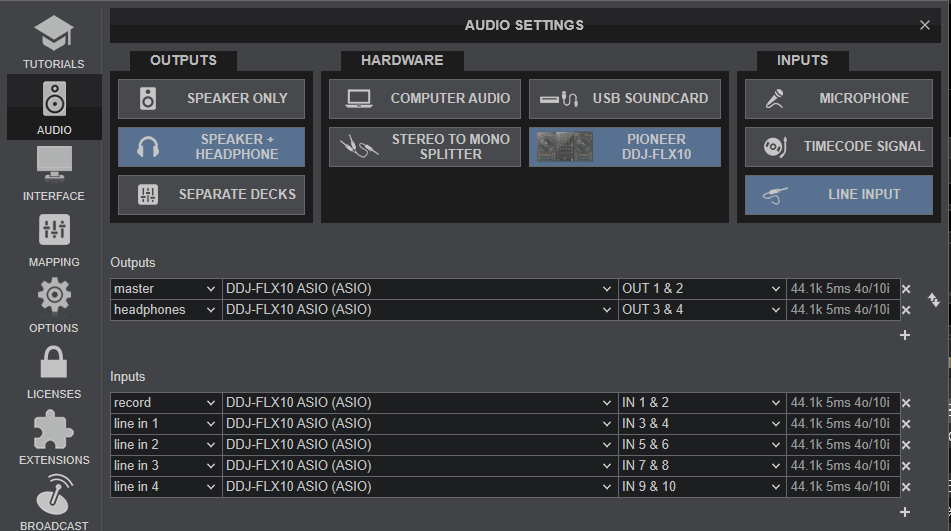
Use the LINE IN On/Off buttons that will be offered on the Decks to enable/disable Line In routing to a VirtualDJ deck.
This will provide the ability to synchronize BPM with other decks, use Effects etc.
MICROPHONE INPUTS
DDJ-FLX10 offers 2 Microphone Inputs and Level/EQ controls from the top panel. Both audio signals from these inputs are directly routed to the Master Output of the unit.
The Microphone inputs are not part of the USB Audio interface, so these cannot be added in VirtualDJ Audio setup and will not control the software Microphone section in the Master panel of VirtualDJ GUI and vice versa.
However, as mentioned in the Recording section, both Microphone Inputs can be recorded via the REC button of VirtualDJ via the dedicated recording input channel of the Audio interface.
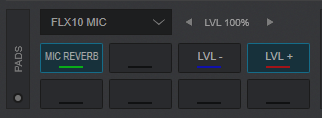
A Reverb Hardware Effect is available to apply to the Microphone Inputs.
To access control to this Fx, hold down the HOTCUE mode button (on any of the Decks) to get the FLX10 MIC page on Pads (or select it from the GUI) and then use the Pads to turn the Reverb FX on Mic on/off and adjust the Reverb Parameter/Level.
Controller Settings
Pioneer DDJ-FLX10 offers a variety of settings and options regarding it's operation.
You can change these settings by connecting your controller, opening VirtualDJ Settings, clicking on OPTIONS tab on the left and then on CONTROLLER category.
The following options will be presented:
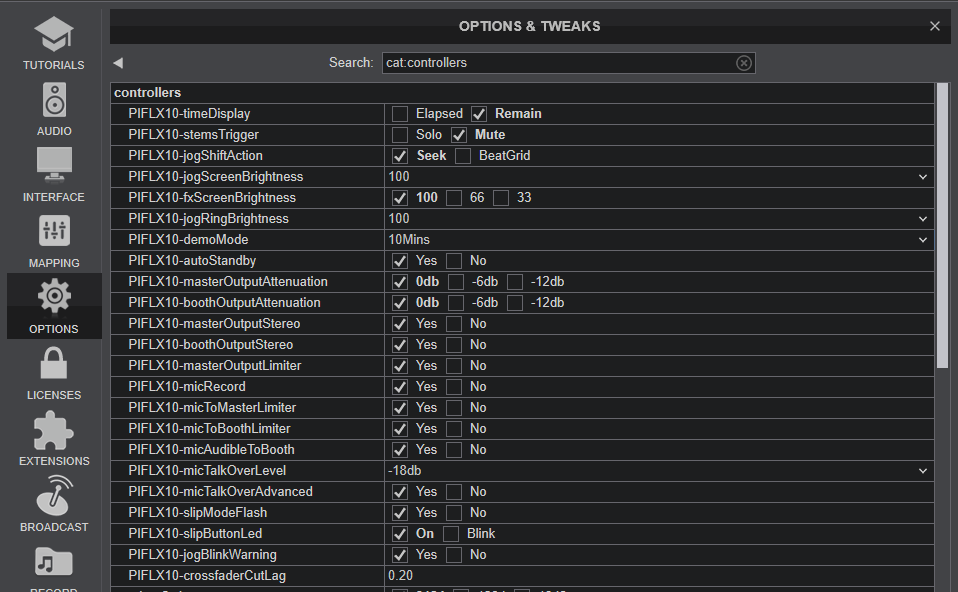
All the settings that are exclusive to Pioneer DDJ-FLX10 will be presented on top, starting with the PIFLX10- acronym:
- PIFLX10-timeDisplay: Set the desired time display for the Jog Screen of the device
- PIFLX10-stemsTrigger: Select the way the ACTIVE PART ( Stems ) buttons will work (Mute or Solo)
- PIFLX10-jogShiftaction: Select the functionality of the Jogwheel when the SHIFT is held down (Seek or Beatgrid Adjust)
- PIFLX10-jogScreenBrightness: Set the desired brightness for the Jog display screen
- PIFLX10-fxScreenBrightness: Set the desired brightness for the FX display screen
- PIFLX10-jogRingBrightness: Set the desired brightness for the Jog ring
- PIFLX10-jogRingColor: Define the Color of the Jog's Ring. If on Stems (default), the Ring will be white if all Stems are enabled or a mix-color of the remaining Stems . The selected color applies to all Decks.
- PIFLX10-demoMode: Set the time that the controller will enter 'Demo Mode' if left alone without any operation
- PIFLX10-autoStandby: Set whether the device should automatically enter standby mode
- PIFLX10-masterOutputAttenuation: Set the desired attenuation level of Master output
- PIFLX10-boothOutputAttenuation: Set the desired attenuation level of booth output
- PIFLX10-masterOutputStereo: Set whether the Master output should be stereo or monaural
- PIFLX10-boothOutputStereo: Set whether the booth output should be stereo or monaural
- PIFLX10-masterOutputLimiter: Enable the device built-in Peak Stop Limiter on Master Output
- PIFLX10-micRecord: If set to Yes, the signal from the Microphone inputs will be recorded/broadcasted along with your mix.
- PIFLX10-micToMasterLimiter: Enable a Peak Stop Limiter for the mic when audible on Master Output
- PIFLX10-micToBoothLimiter: Enable a Peak Stop Limiter for the mic when audible on Booth Output
- PIFLX10-micAudibleToBooth: Set whether the mic should be audible on Booth Output
- PIFLX10-micTalkOverLevel: Set the threshold for mic talk-over function
- PIFLX10-slipModeFlash: Set whether or not the pads should blink when slip mode gets enabled
- PIFLX10-slipButtonLed: Set whether or not the slip button should blink when slip mode gets enabled
- PIFLX10-jogBlinkWarning: Set whether or not the Jog Ring should blink as a warning near the end of the track
- PIFLX10-crossfaderCutLag: Adjust the crossfader cut point
Please note that any changes made on these settings take effect immediately.
