Midiplus - SmartPAD
Controls
The Smartpad is pre-defined to control the VirtualDJ Sampler and offers 4 hardware modes selected from the 4 bottom right buttons.
 A MODESSelect one of the 4 available Mode buttons, Clip, Mode 1, Mode 2 and SetB ARROWSThese buttons offer no functionality neither can be assigned/mapped as they are not part of the MIDI protocol
CLIP MODE (default)
Press the bottom
Clip mode button to set the device to Clip mode. This mode is pre-selected each time you (usb) power-cycle the device.
In this mode the device is offering controls of the VirtualDJ Sampler.
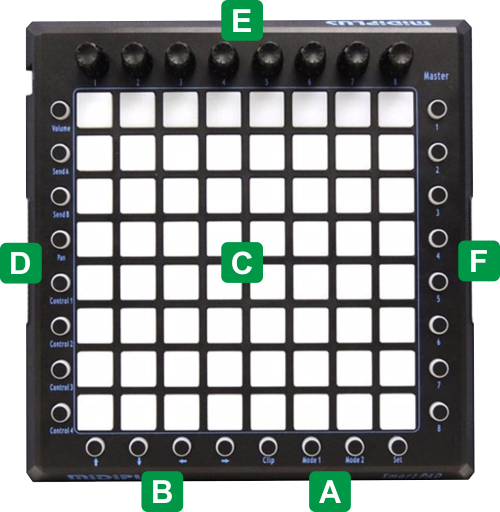
C PADSThese 64 Pads trigger Samples 1 to 64 of the selected VirtualDJ Sampler Bank. 1st top row controls Samples 1 to 8, 2nd row from top controls Samples 9 to 16 etc.
When a Sample is loaded to a slot, the Pad will get the color of the Sample and will blink when playing. Note that due to limited offered colors of the device, the colors of the Pads may differ from the sample's color (VirtualDJ will try to match the nearest available)D ROTARY MODESSelect one of the 8 available layers/modes for the top rotaries. These buttons are hardware layers, so they cannot be mapped to a different function, neither their leds can be controlled from VirtualDJ. E ROTARIESControl the Volume of each Sample depending on the Rotary Layer. When the 1st layer is selected (Volume), the 8 rotaries will control the volume of Samples 1 to 8, when the 2nd layer (Send A) is selected, the 8 rotaries will control the volume of Samples 9 to 16 etc. F BANKSThese 8 buttons select the first 8 Sampler Banks of VirtualDJ. These buttons don't offer any led control, meaning that selection needs to be verified from the GUI.MODE 1
Press the bottom
Mode 1 mode button to set the device to Mode 1.
In this mode the device is offering different Midi controls than the ones in Clip mode but these are not pre-assigned to any VirtualDJ action, mostly because none of the pads and buttons offer any led control.
C PADS64 Pads free to assign to any VirtualDJ action. Note that there is no led control from the firmware.D ROTARY MODES8 buttons free to assign to any VirtualDJ action. Note that there is no led control from the firmware. E ROTARIESControl the Volume of each Sample depending on the Rotary Layer. The layer cannot be selected from this mode, but is using the one selected in other modes. F BANKS8 buttons free to assign to any VirtualDJ action. Note that there is no led control from the firmware.MODE 2
Press the bottom
Mode 2 mode button to set the device to Mode 2.
In this mode the device is offering different Midi controls than the ones in Clip mode but these are not pre-assigned to any VirtualDJ action, mostly because none of the pads and buttons offer any led control.
C PADSThe top 5 rows of Pads offer no functionality, so cannot be mapped. The bottom 3 rows (24 Pads) are free to assign to any VirtualDJ action. Note that there is no led control from the firmware.D ROTARY MODESSelect one of the 8 available layers/modes for the top rotaries. These buttons are hardware layers, so they cannot be mapped to a different function, neither their leds can be controlled from VirtualDJ. E ROTARIESControl the Volume of each Sample depending on the Rotary Layer. The layer cannot be selected from this mode, but is using the one selected in other modes. F BANKSThese buttons offer no functionality in this mode neither can be assigned/mapped as they are not part of the MIDI protocolSET MODE
Press the bottom
Set mode button to set the device to Set mode.
In this mode the device is offering Volume controls on the Pads (8 vertical groups of 8 pads each), following the same hardware layer of the Rotaries.
C PADSWhen one of the 4 top hardware rotary layers is selected, the pads are split into 8 vertical groups (8 pads each), offering pad-style volume control same as its top rotary. The leds will indicate the volume in a pre-defined and hardcoded color. There is no functionality if the last 8 layers are selected (Control 1 to Control 4)D ROTARY MODESSelect one of the 8 available layers/modes for the top rotaries. These buttons are hardware layers, so they cannot be mapped to a different function, neither their leds can be controlled from VirtualDJ. E ROTARIESControl the Volume of each Sample depending on the Rotary Layer. The layer cannot be selected from this mode, but is using the one selected in other modes. F BANKSThese buttons offer no functionality in this mode neither can be assigned/mapped as they are not part of the MIDI protocol


