


DJ-707M
Deck Controls
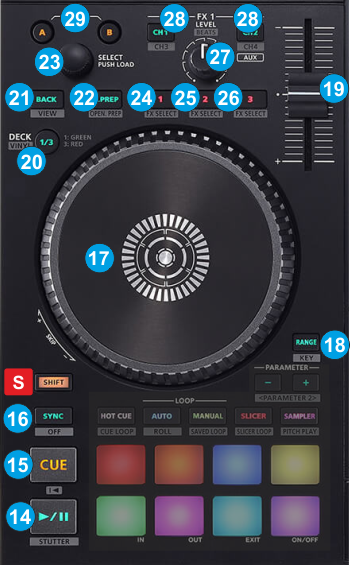
S SHIFT.Hold this button down to access additional functionality for several buttons/knobs as described in this manual.
- PLAY: Play/Pauses the track. Hold SHIFT and then press this button to play the track in Stutter mode (while pressed)
- Cue : When the Deck is paused, you can set a temporary Cue Point by moving the Platter to place the Audio Pointer at the desired location and then pressing the Cue Button. During playback, you can press the Cue Button to return the track to this Cue Point. (If you did not set a Cue Point, then it will return to the beginning of the track.). If the Deck is paused, you can press and hold the Cue Button to play the track from the Temporary Cue Point. Releasing the Cue Button will return the track to the temporary Cue Point and pause it. To continue playback without returning to the Temporary Cue Point, press and hold the Cue Button, then press and hold the Play Button, and then release both buttons.
Hold SHIFT and then press this button to return to the beginning of the track - SYNC: Syncs the deck with the Master Deck. The Master Deck selection is made automatically by VirtualDJ, mostly depending on the Deck that is playing out in Master .
Hold SHIFT and then press this button to manually set a deck as Master Deck and force all other decks to sync to the Master Deck when SYNC is used. To return to the automatic selection, press again the button on the deck that is currently lit. - JOG: Touch sensitive platter for scratching or bending. When in Vinyl mode, use the upper part of the jogwheel to Scratch and the outer part to bend. When in Bend mode (Vinyl mode is disabled), use any part of the jogwheel to bend.
Hold SHIFT and use the JOG in Seek (Search) mode. - RANGE: Press this button to select the next available % range for the Pitch fader
Hold SHIFT down and then use this button to enable/disable Master Tempo (Key Lock) and allow the Key of the track to retain its value when in Tempo changes. - PITCH : Pitch fader to adjust the Tempo of the track.
- DECK SELECT: Use these buttons to select a Deck for the left and right side to control. The Left side of the DJ-707M can control decks 1 (button lit in green) or 3 (button lit in red), and the Right side can control decks 2 (button lit in green) or 4 (button lit in red).
Hold SHIFT down and then use this button to toggle between the CD (Bend) and Vinyl ( Scratch ) modes for the Jogwheel - BACK: Use this button to set focus to the Folders list of Browser. If focus is already in Folders list, use this button to open/close sub-folders.
Hold SHIFT down and then use the BACK button on the left side to cycle though the available Mixer panels of VirtualDJ GUI ( Mixer , Video, Scratch and Master )
Hold SHIFT down and then use the BACK button on the right side to cycle focus of the Browser windows (Folders, Songs and Sideview) - PREPARE: Use this button to add the selected track from the Songs Browser list to the Automix list of Sideview
Hold SHIFT down and then use this button to cycle through the available lists of Sideview (Automix, Sidelist , Sampler, Karaoke and Shortcuts) - SELECT/LOAD: Use this knob scroll through files or folders depending on the focused Browser window (Folders, Songs, Sideview).
Push to load the selected track to the deck. If focus is on Folders list, the button will set focus to the Songs list.
EFFECTS
The left and right FX units apply VirtualDJ effects to the Left and Right decks respectively and operate differently depending on the FX Slots layout mode (1 FX or 3 FX slots). The mode can be selected from the VirtualDJ GUI
- FX 1: Use this button to enable/disable the selected effect on the Left/Right deck
Hold SHIFT down and then use this button to select the next available effect - FX 2: Hold this button down and then use the FX LEVEL (27) to adjust the 2nd parameter of the selected effect (if available)
- FX 3: Hold this button down and then use the FX LEVEL (27) to adjust the 3rd parameter of the selected effect (if available)
- FX LEVEL: Use this knob to adjust the 1st parameter of the selected effect. If FX 2 or FX 3 buttons are held down, parameters 2 and 3 can be adjusted using the same knob.
- FX ASSIGN: These buttons are not pre-assigned to any VirtualDJ script action, since the FX units always apply to whatever deck is assigned as Left or Right, and can be customized to your needs.
Single FX mode
- FX 1: Use this button to enable/disable the selected effect of the 1st FX slot on the Left/Right deck
Hold SHIFT down and then use this button to select the next available effect for FX Slot 1 - FX 2: Use this button to enable/disable the selected effect of the 2nd FX slot on the Left/Right deck
Hold SHIFT down and then use this button to select the next available effect for FX Slot 2 - FX 3: Use this button to enable/disable the selected effect of the 3rd FX slot on the Left/Right deck
Hold SHIFT down and then use this button to select the next available effect for FX Slot 3 - FX LEVEL: Use this knob to adjust the 1st parameter of the selected effect of all FX Slots at the same time
Hold SHIFT button down and then use this knob to adjust the 2nd Parameter of the selected effects of all FX Slots - FX ASSIGN: These buttons are not pre-assigned to any VirtualDJ script action, since the FX units always apply to whatever deck is assigned as Left or Right, and can be customized to your needs.
Multi FX mode
DUAL USB - DJ CHANGE-OVER
The Roland DJM-707M offers 2 USB ports at the rear panel, to connect 2 computers running VirtualDJ (or other supported software), making the DJ changeover easy.
- PC A B: Use these buttons to select the USB port (to which a computer is connected at the rear panel) and assign a side of the DJM-707M (left or right) to VirtualDJ (or other supported software).
When only 1 computer is connected to the USB ports (A or B), those buttons have no functionality.