


User Manual
audio Mixer
The Mixer panel offers a variety of different audio mixing tools depending on the layout chosen. All layouts provide the basic mixing tools required; Volume Faders, 3 Band EQ, VU meter, PFL and Crossfader.
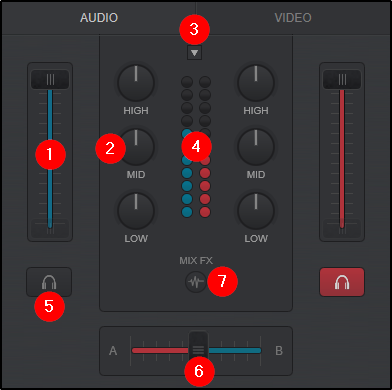
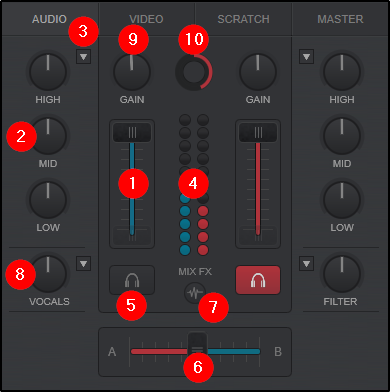
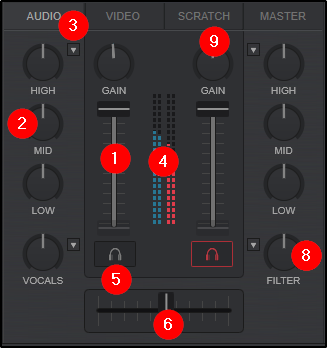
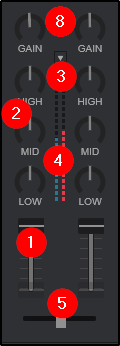
- VOLUME FADERS. Used to control the volume of each one of the available Mixer ’s channels. If an External Mixer configuration is used (See External Mixer Audio Setup), it is best to leave the volume faders in their maximum (top) position.
- EQ. Use the HIGH, MID and LOW knobs to adjust the high, mid and low equalizer bands of each of the available Mixer channels. Double-click to reset each one of the EQ bands to zero (off) position. Advanced EQ Modes can be selected in the EQ MODE MENU.
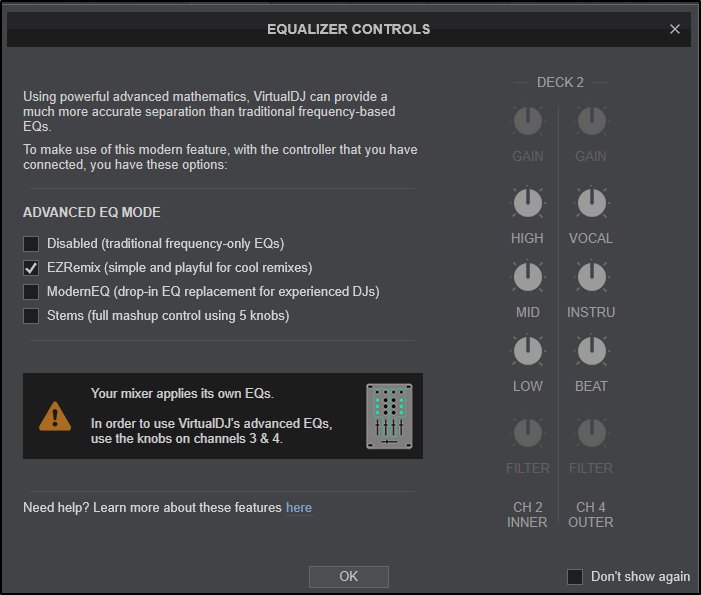
- EQ MODE MENU (64bit versions). The advanced EQ modes provide stem-based equalizers that remove the traditional HIGH, MID & LOW frequencies and replace them with more modern EQ controls to provide isolation for different track elements such as vocals, instruments, and drums.
There are three modes available: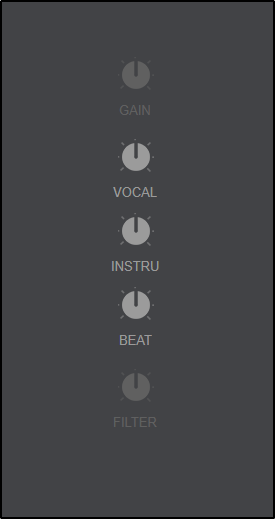
EZRemix ModernEQ Stems
EZRemix - With separate controls for the vocals, instruments, and beat, this mode provides the ability to instantly manipulate the track and perform mashups and remixes on the fly. Turning the knobs to the left will remove this stem in the mix, while turning to the right will isolate the stem.
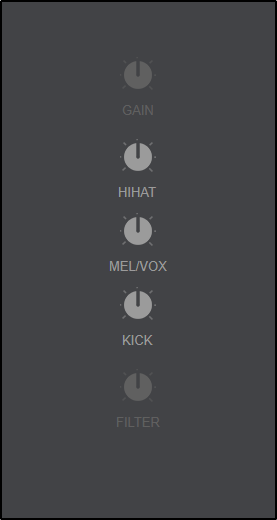
ModernEQ - This mode gives more control to experienced DJs, with separation between the hihats and kicks and is similar to traditional frequency-based EQs. This mode is great to perform seamless transitions, where you can control the 'energy' of your tracks, by adjusting each decks hihats, while ensuring the kicks don't interfere with each others. The middle knob will let you adjust both the vocals and melody to avoid clashes. Turning the middle knob to the full left will kill both the melody and vocals. Half-way to the left will kill only the vocals. While turning to the right will first boost a little vocal, while all the way will kill the melody.
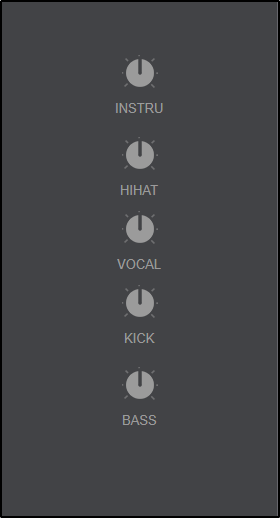
Stems - Using all 5 knobs on your Mixer , including gain and filter, you can control each of the main 5 Stems individually, boosting or lowering each component.
Alternatively, if your Mixer has only 2 decks or isn't midi, or if you prefer instant on/off, you can also use the PADS buttons, to quickly kill or isolate each stem at the touch of a button.
Select "stems" in the pads page drop-down to load the stem controls.
It is important to note that not all hardware devices are the same and will handle the EQ modes differently. For more information please see: Advanced EQ Modes with Hardware.
Advanced EQ Modes can be toggled on and off by clicking on the dial text. When clicking on the text the EQ will revert to traditional frequencies (HIGH/MID/LOW). Clicking again will toggle back to the advanced EQ Mode. - VU METER. Displays the Mixer channel's output volume.
- PFL. Use the PFL (Pre-Fade Listen) buttons to send any of the Mixer channels to the Prelisten (Headphones) channel.
- CROSSFADER. Slide the crossfader to route the left or right deck to the Master Output. If the crossfader is at the far left side, only the left deck will be audible in the Master Output. If the crossfader is at the far right side, only the right deck will be audible in the Master Output. At any other position, both decks will be audible. For External Mixer setups the crossfader should remain in the middle
- MIX FX ( Starter & Essentials Layouts). Mix FX provide an easy to use alternative to traditional effects. Simply sliding the crossfader from one deck to the other will automatically add an effect which will assist in blending the 2 decks together seamlessly.
Clicking on the Mix FX button will provide a menu of available effects that are automatically activated every time the crossfader is moved. Select from None (for the feature to remain off), Filter, Echo, Reverb, Loop Roll, Noise, or Echo Out.
When an effect is selected it will remain active until either a new effect is selected, or the crossfader is moved to the closed position (far left or far right).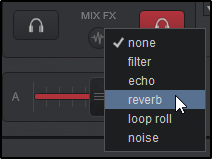
- FILTER/COLOR FX (Essentials & Pro Layouts). Use the FILTER (default) knobs to apply a Low-Pass or a High-Pass filter to each of the available Mixer channels. On the middle position, no Filter is applied. Double-click to reset (off position).
Clicking on the FILTER drop down button reveals the ColorFX Menu. Clicking on an effect will replace the filter text with the chosen effect name. The actions are identical to the Filter positions with the exception of the effect chosen.
Select from Cut, Distortion, Echo, Flanger, Filter (default), Noise, Loop Roll, Pitch, Reverb, or Spiral.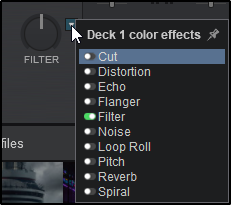
- GAIN (Essentials & Pro Layouts). Use the GAIN knob to adjust the gain applied to the loaded track. If the knob is to the middle position (12 o’clock) the output level is set by the software to zero dB in order to normalize the audio levels (0 dB by default or other value defined from Options).
The applied gain value will be displayed under the gain knob. Double-click to set the GAIN to the middle position (zero dB value) When a track is loaded on a deck, VirtualDJ will calculate and set the output level of the track to the given zero dB value. The GAIN knob can be used then to make additional adjustments. VirtualDJ will set the gain to zero (or saved value) if the track is pre-analyzed or has been played before. If not, the software will set the gain to its zero value (if the track is not playing by the time the track is fully loaded). Different behaviors are available by changing the AutoGain setting (see Options).
More information on VirtualDJ’s gain structure can be found here. - PHRASE INDICATOR AND SYNC (Essentials Layout). This displays the current Phrase the track is on. Clicking on it will automatically sync the Phrase of the opposing deck.
4-Channel Mixer (pro layout)

If 4-Decks is selected in the Pro Layout Options, an additional option to display the 4-Channel Mixer will become available. The 4-Channel Mixer has all of the control functions of the 2 channel Mixer with the addition of 2 extra channels and some additional features:
An additional option, Hamster (inverted), is also available to reverse the crossfader's traditional behavior where moving it to the left will make the right side audible, and moving it to the right will make the left side audible.
Clicking on Show Crossfader Assign will toggle on/off the Crossfader Assignment buttons (see 13).
*To learn more about how crossfader curve works click HERE.
The assign buttons are used to assign a deck as left or right side of the crossfader. If the crossfader is at the far left side, only the left-assigned decks will be audible in the Master Output. If the crossfader is at the far right side, only the right-assigned decks will be audible in the Master Output. At any other position, all right or left-assigned decks will be audible. If a deck is not assigned as left or right, it will be audible regardless of the crossfader position.
Advanced EQ Modes with Hardware
Not all hardware handles the advanced EQ modes identically. When using the advanced EQ modes with different hardware devices it is important to understand their capabilities and limitations.
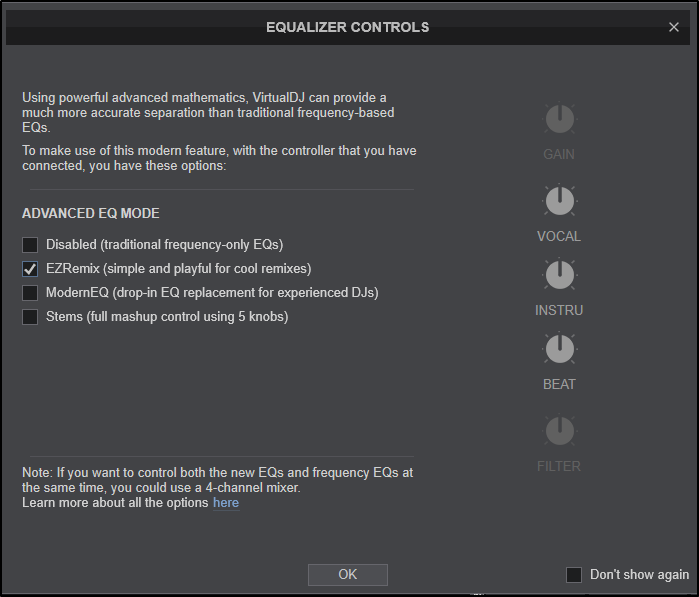
A. 2 Channel MIDI
If using a 2 channel MIDI controller/mixer that doesn't apply it's own hardware EQ you will be able to utilize any of the 3 EQ mode options.
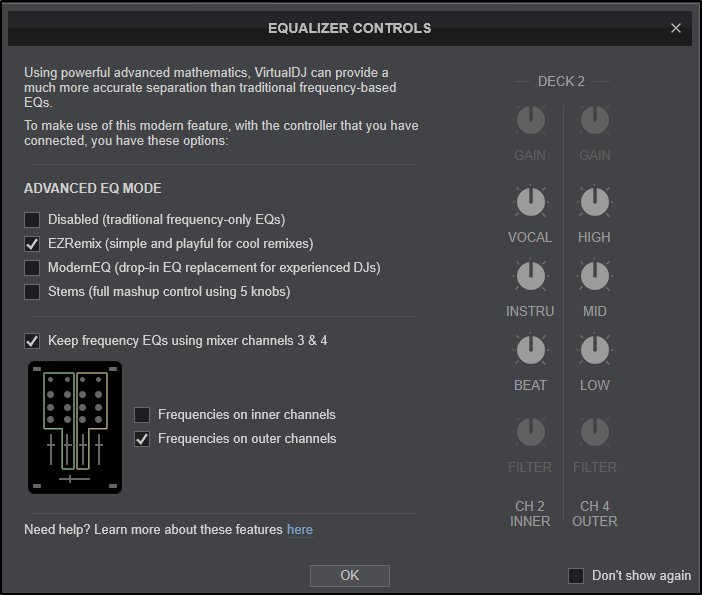
B. 4 Channel MIDI
If using a 4 channel MIDI controller/mixer that doesn't apply it's own hardware EQ you will be able to utilize any of the 3 EQ mode options on the inner channels OR select the outer channels to host the EQ mode options while still being able to use standard EQ frequencies on the inner channels.
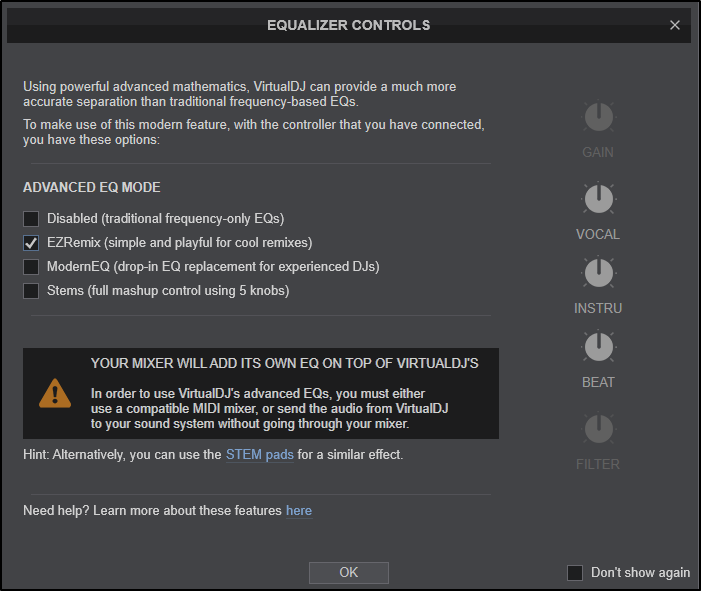
C. 2 Channel Hardware Mixer
If using a 2 channel hardware Mixer , the EQ frequencies are controlled by the Mixer itself and not VirtualDJ. In this case Stems can only be used on the Stems Pads.
This also applies to External Audio configurations (4 channel hardware mixers) that do not send/receive MIDI.
D. 4 Channel Hardware Mixer
If using a 4 channel hardware Mixer , the EQ frequencies are controlled by the Mixer ’s inner channels and the outer channels are automatically configured to control any of the 3 EQ mode options.
Please consult the hardware manual of your device for more information.